How to set your store address
Claim your store name in Swipefast so every checkout gets a short, branded link like yourname.swipefast.io/your-product that you can share anywhere.
Your store name is the part before .swipefast.io. Each checkout adds its own short path after it. So a store called janecoaching with a checkout path of launch-kit becomes janecoaching.swipefast.io/launch-kit.
Claim your store name
- 1. In the sidebar, under Account, open Profile & branding.
- 2. Scroll to Store address.
- 3. Type your Store name. The address preview updates under the box.
- 4. Click Save profile.
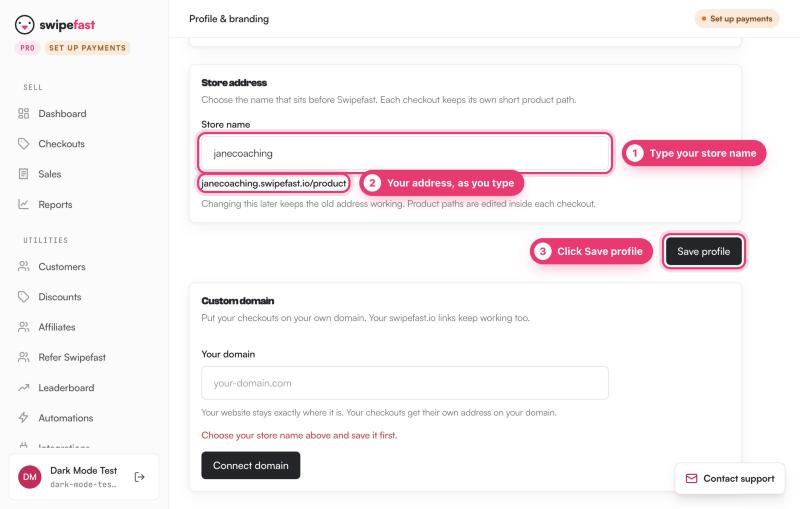
You can also get there from Checkouts. Until you claim a name, that page shows Claim your Swipefast address with a Choose my store name button.
Store name rules
- At least three characters.
- Lowercase letters, numbers and hyphens only.
- It can't already be taken by another seller.
- A few names are reserved, such as www, support and blog.
Change a checkout's path
- 1. Open the checkout in the editor and click the Offer block.
- 2. Edit Buyer link.
- 3. Click Change.
Older links keep working when you change a path, so links you've already shared don't break.
Renaming your store
You can rename your store later, and the old address keeps working. Once claimed, a store name can be renamed but not removed.
Questions people ask before choosing
What happens to my old links if I rename my store?
They keep working. Swipefast keeps your previous store address pointing to your checkouts.
Do I have to claim a store name?
No, your checkouts work without one. A store name gives you a cleaner link that carries your name.
Can I use my own domain?
Yes. Type your domain in Profile & branding and your checkouts live at checkout.your-domain.com. Until you do, your address is your-store-name.swipefast.io.