How to connect Stripe and start taking payments
Connect your Stripe account to Swipefast, finish Stripe's identity checks, and switch your checkouts from test mode to taking real card payments.
Swipefast takes card payments through your own Stripe account. Buyers pay you directly and the money lands in your Stripe balance. Until Stripe is connected, every checkout runs in test mode and no card is charged.
Connect Stripe
- 1. In the sidebar, under Utilities, open Integrations.
- 2. Find the Stripe card and click Add integration.
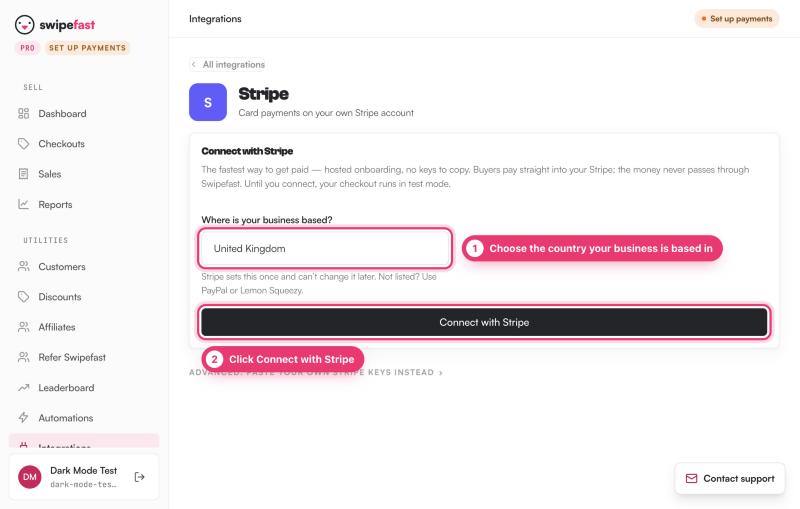
- 3. Under Where is your business based?, choose your country. Stripe sets this once and can't change it later, so pick the country your business is registered in.
- 4. Click Connect with Stripe. Swipefast sends you to Stripe's own secure sign-up.
- 5. Answer Stripe's questions. Stripe asks about you, your business, and where to send your payouts.
- 6. When you finish, Stripe sends you back to Swipefast. The Stripe panel should now say Live, with Taking payments set to Yes.
- 7. Check the badge at the top of your dashboard. It should say Live mode.
If Stripe asks for more details
Stripe checks every new account before it lets cards through. It may ask for ID, a business address, or a bank account. That is Stripe's process, not Swipefast's, and it can happen during sign-up or later.
- If the Stripe panel says Onboarding not finished, or Stripe needs a little more, click Finish Stripe setup. Stripe opens and asks only for what's still missing.
- You may also see a banner at the top of your dashboard called Finish connecting Stripe. Its button takes you to the same place.
- While onboarding is unfinished, your checkouts stay in test mode and no buyer can be charged. If Stripe has already approved your details but hasn't switched card payments on, published checkouts show as paused rather than taking practice orders.
- If the panel says Live but Details submitted reads Stripe still needs some, cards work now, but Stripe wants more information. Give it what it asks for so nothing gets held up later.
What buyers see once you're live
Buyers enter their name, email and country, then their card. Link, Stripe's saved-card checkout, appears in the card form on its own, so returning Link users can pay faster. You don't need to set it up.
Tax is off by default. Only turn on Stripe Tax if you need it. Our Stripe Tax guide explains how it works.
Disconnecting
The Stripe panel has a Disconnect button. If you use it, your checkouts go back to test mode until you connect again. Any order still waiting to be settled or refunded on that account would then need finishing in Stripe directly, so avoid disconnecting in the middle of a launch.
Questions people ask before choosing
Why does my checkout still say test mode?
Either Stripe onboarding isn't finished, or test mode is switched on in Settings. Check the Stripe panel in Integrations first, then the Payments card in Settings.
Does Swipefast hold my money?
No. Card payments go straight to your Stripe balance and Stripe pays them out to you. Swipefast takes 0% of your sales, except 0.2% on orders where you've switched on Stripe Tax.
Can I take PayPal as well?
Yes. In Integrations, open PayPal and paste the Client ID and Client Secret from your PayPal Developer Dashboard, under Apps & Credentials, Live. PayPal then shows as a separate option at checkout.
Can I use keys from a Stripe account I already have?
Connect with Stripe is the recommended route. The same page also has a section called Advanced: paste your own Stripe keys instead, if you need it.